
Adding and Working with a Jenkins Multibranch Pipeline
Now comes the bit part. Many bits and bobs, but will try to capture all the steps required to install Jenkins as well as setup a repo together with the key links that helped me along the way.
Install Jenkins, lets start from the top
So, Jenkins install. Easy, instructions found here.
Below is the code block to install the LTS version of Jenkins on Debian. LTS because we don’t want to get constant updates on our Jenkins environment and having us micromanage our CI/CD software at a possibly much more granular level. We want to aim for “set it and forget it” for the most part.
curl -fsSL https://pkg.jenkins.io/debian-stable/jenkins.io.key | sudo tee \
  /usr/share/keyrings/jenkins-keyring.asc > /dev/null
echo deb [signed-by=/usr/share/keyrings/jenkins-keyring.asc] \
  https://pkg.jenkins.io/debian-stable binary/ | sudo tee \
  /etc/apt/sources.list.d/jenkins.list > /dev/null
sudo apt-get update
sudo apt-get install jenkins
One thing worth mentioning as we did just install jenkins, all jenkins processes will be run as the jenkins user, which is why we installed the RVM and ruby environment on the jenkins user as described in the RVM and Jekyll install for Jenkins post
I’m paraphrasing, but on first login, you’ll be asked to “install commonly used plugins”. It’s highly recommended that you do this.
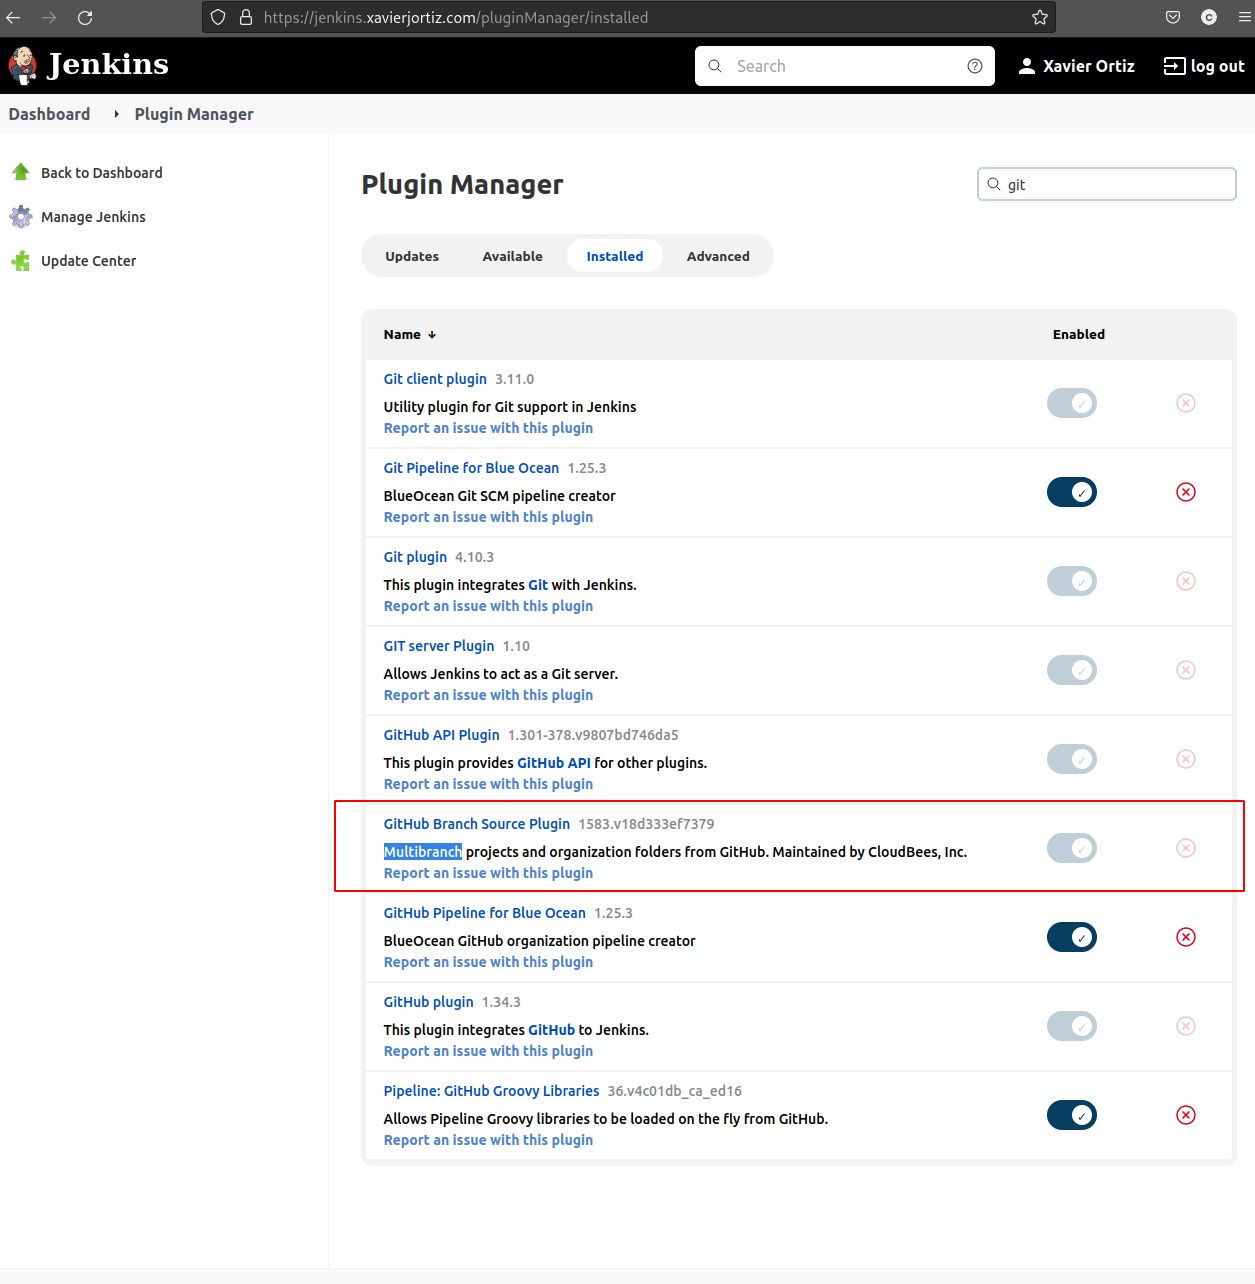
Installing Github Multibranch GitSCm plugin
Make sure you have the Git Branch Source Plugin. This will allow you to add a webhook to your git repo, so that any change that is uploaded would get sensed by Jenkins, and it’s process would get kicked off.
Setting up a pipeline for Jekyll portfolio sourced from github
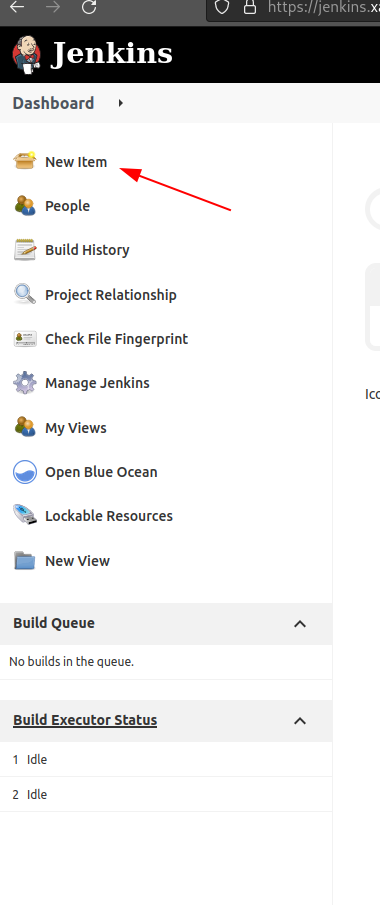
After logging into Jenkins, click on new Pipeline here.
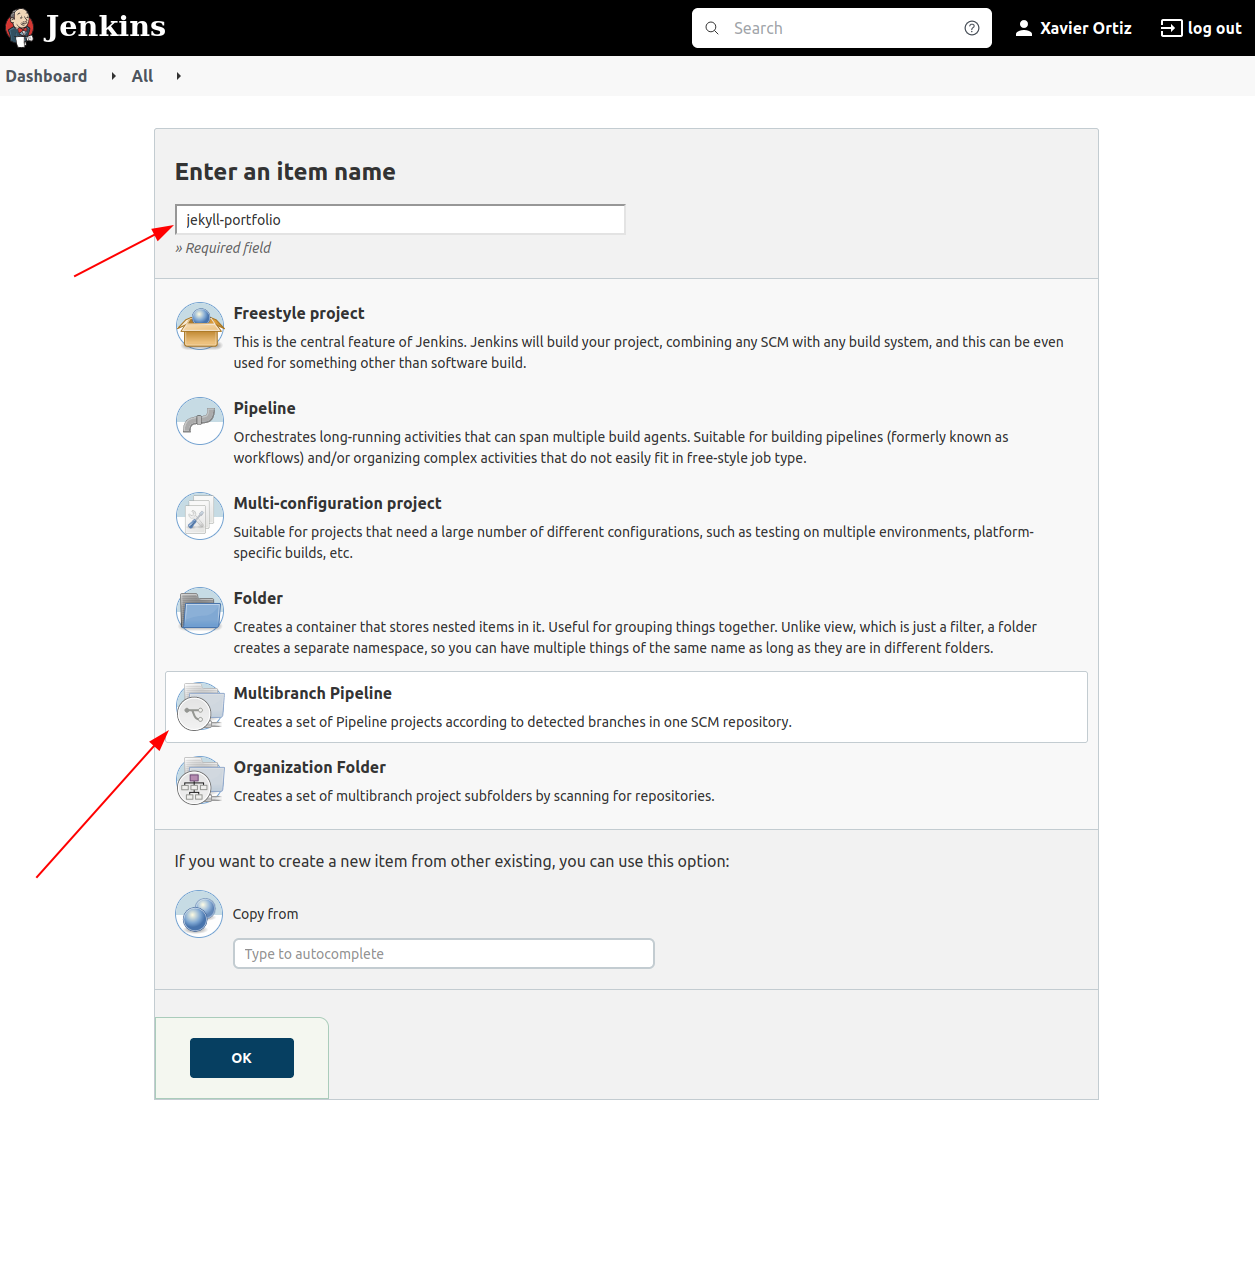
Select Multibranch Pipeline, and fill in a meaningful name, like shown below
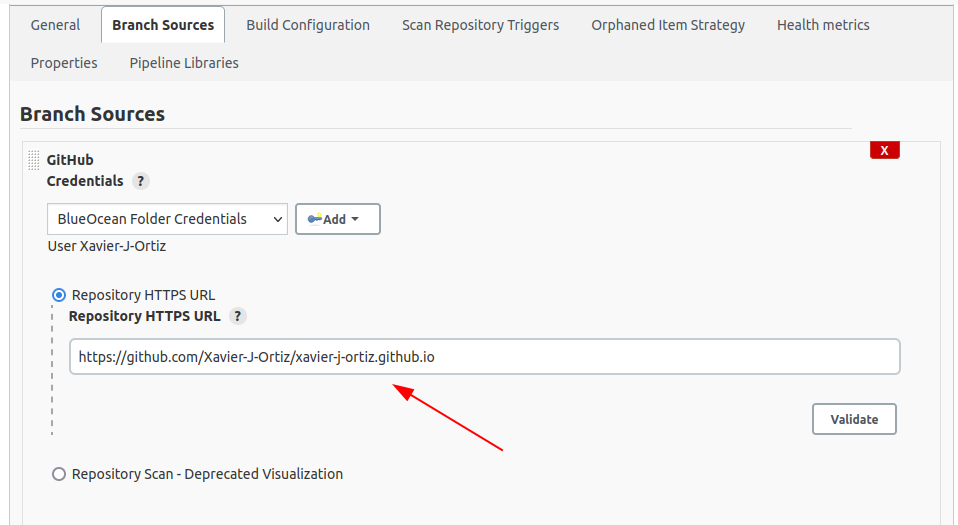
Select Github as the branch source and input the repository. Notice that the Blue Ocean credentials were input. This automagically got added once when I added the repo on BlueOcean. However, I don’t know how to remove it. You can use credentials as “none” for the time being, and not have any additional issues, as this repo is public.
At a later date, I’ll find a way to generate the proper token or auth manually, as I would like to move off of the Blue Ocean credentials.
Since we installed the Git Branch Source Plugin, you can now add the webhook for github so that it will trigger Jenkins to pull and run it’s configured build process.
Select the Scan by webhook and input a token of your choosing. You’ll need to use this token and add it to github when creating the webhook later on.
I added a value for Periodically if not otherwise run, once a day, just in case the webhook breaks for whatever reason. Not required.

Scroll to the bottom and hit save!
Voila, it’s done!
Webhook on Github
So, we’ve configured the webhook token on Jenkins. Lets create the webhook on Github. Remember, you will need the token you created on the pipeline creation.
Go to your repo, and select your repo’s settings.
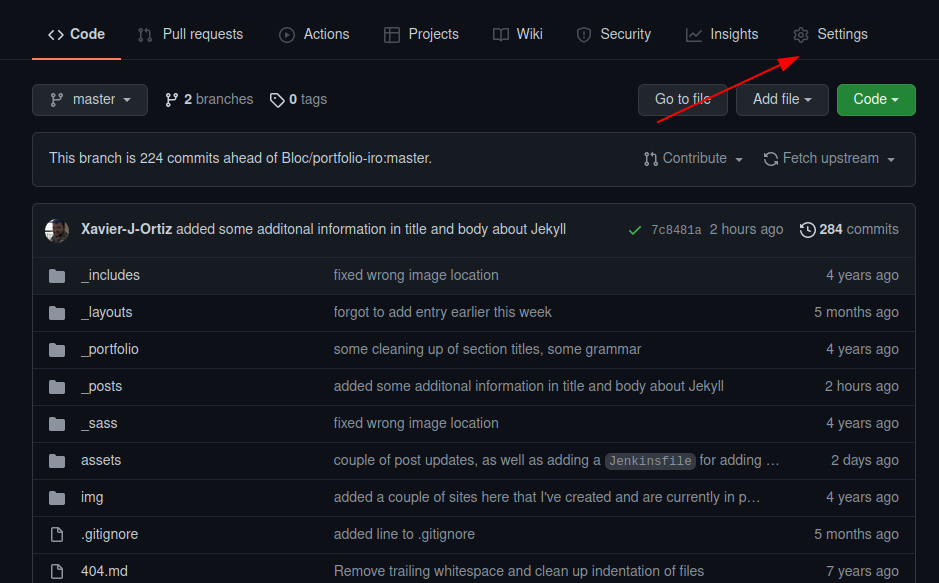
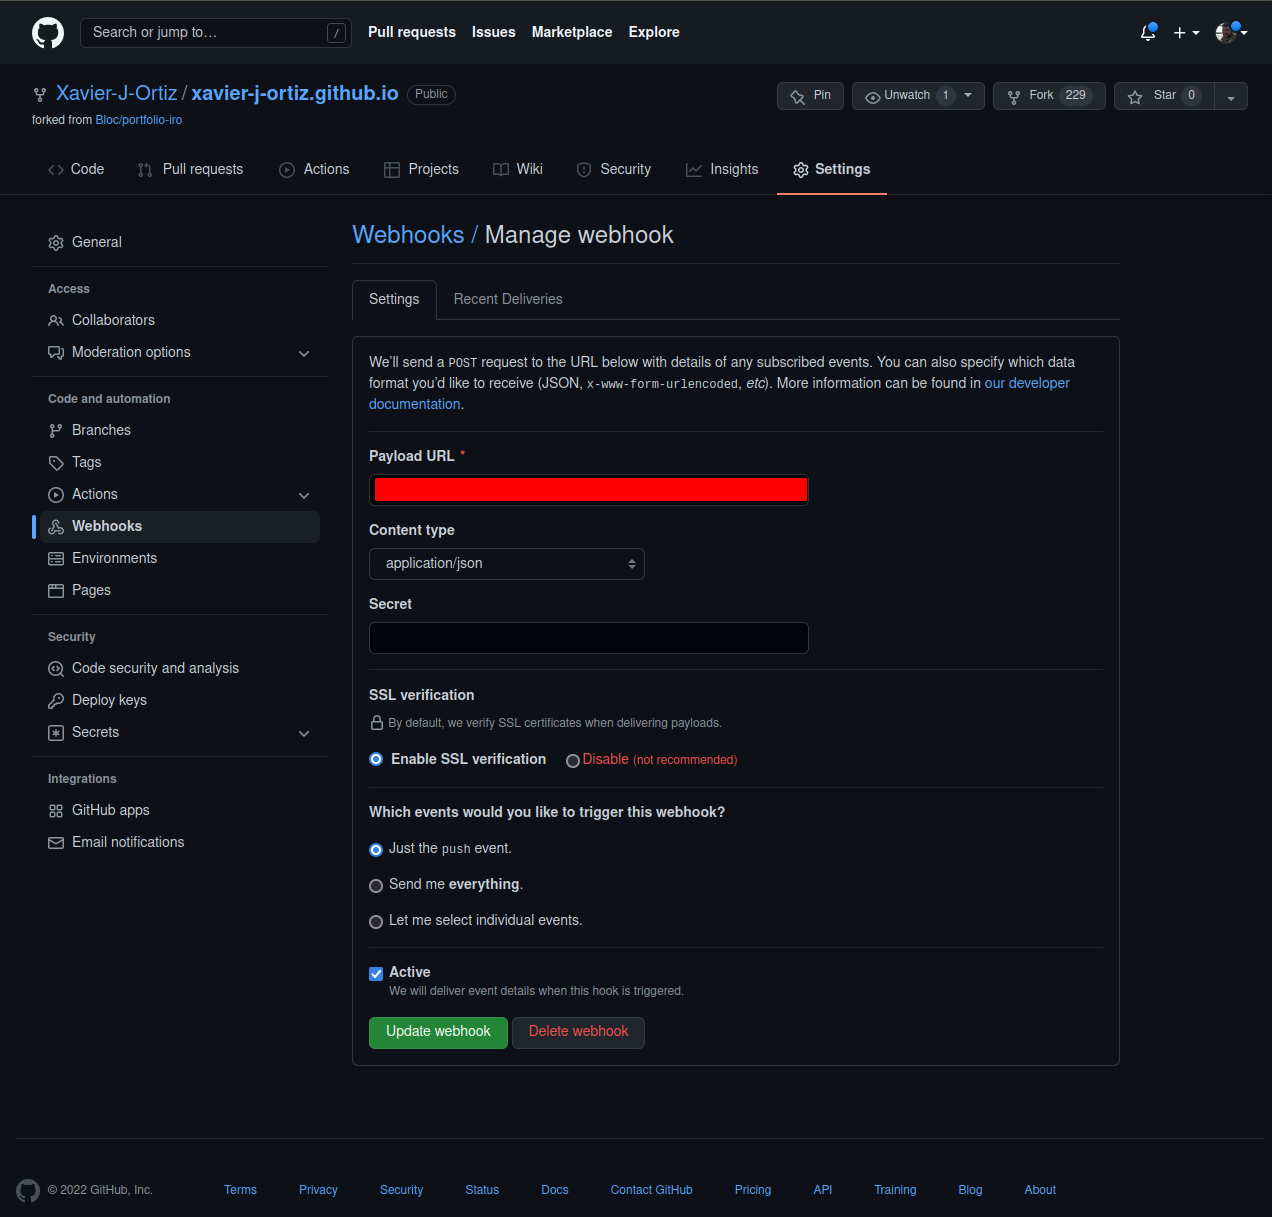
Then on the left pane, select webhooks and Add webhook.
Under the Manage webhook view, specify the Payload URL like so: JENKINS_URL/multibranch-webhook-trigger/invoke?token=[Trigger token] and set the Content type as application/json. You can then set all the rest of the settings as you would like. I’d recommend that SSL verification be setup, but you may need to set up your workload to be served via https.
Congrats! You’re now going to let Jenkins run this pipeline once one of your repositories is updated.
Home Stretch, creating and understanding the Jenkinsfile
I remember that in the order of things, this was the first part that I huge issues with. But it all boiled down to not understanding that all these scripts were run by the jenkins users, and creating the environment links in files such as .bashrc, as well as making sure that the .bashrc file is sourced when the script is run. So, there was a lot of trial and error, but in the end, the resulting script was this.
pipeline {
    agent any

    stages {
        stage('Testing') {
            steps {
	sh '''
	  cd .
	   '''
            }
        }
    stage('Building') {
            steps {
	sh '''
	  source ~/.bashrc
	  pwd
	  bundle install
	  bundle exec jekyll build
	   '''
            }
        }
    stage('Deploy') {
		when {
		  expression {
				env.BRANCH_NAME == 'master'
			}
		  }
            steps {
		sshagent(credentials: ['xxx-xxx-xxx']) {
		  sh '''
	  	  scp -r -i ~/.ssh/id_rsa _site/* xortiz@localhost:apps/xavier-j-ortiz.github.io/_site
		  ssh -i ~/.ssh/id_rsa xortiz@localhost "sudo systemctl reload nginx"
	   	  '''
            }
	    }
        }
    }
}
It is not optimized, and will probably need to have a once over, but this so far worked.
So, to do a high level explanation of this, with CI/CD, you want your processes to run by stages. i.e. Test, Build, Deploy.
Test
Fortunately, we don’t really need to test, because I’m constantly running jekyll serve which shows me my content when I open my browser to localhost:4000. So I know if my additions/changes are working or not. Probably wouldn’t be bad to do a dry run here though. May change it at a later date. In a way, I’m just checking the directory I’m in under this current Test stage. Not necessary, but at one point it was during my discovery of how Jenkinsfile works, and how it’s running it’s console commands and scripts.
Anyway, the build and deploy part is where the real work is done.
Build
The Build stage is where the static content for the site is built. It is built in the root directory of the repo file tree, and is spit out under _site. When built, _site would be the root folder which I should host in order to see this portfolio/blog website.
Of note, source ~/.bashrc is needed since it has all the ruby/rvm environment paths which are needed for jenkins to run the bundle and jekyll commands successfully. It is super counterintuitive since this shell is bash, not sure why I have to source .bashrc again, but whatever.
bundle install is run so that we know that the environment is ready and has all the dependency gems it would need.
And finally, bundle exec jekyll build is what actually builds the static content in _site.
With that we move on to the Deploy portion
Deploy
I was very happy and surprised with the last deploy section. It allowed me to determine in a very nice way, if the env.BRANCH_NAME == 'master' branch was the process that was being run, then and only then should we Deploy.
This detail is super important as I do not want to deploy anything that is not in the master branch.
The reasoning behind this is, say we run something on a made up branch called booby-trap branch. Every time I commit something to this branch, on Jenkins, the Test, Build, Deploy stages would run. Test and Build are all well and good, but the Deploy portion would not be welcome as this would overwrite the master branch generated _site folder and more importantly restart nginx which would then put any branch’s commits into full fledged production. Not an ideal scenario!
This is why we added the expression:
		  expression {
				env.BRANCH_NAME == 'master'
			}
		  }
Basically an if case evaluation expression. So, if the branch that is being run and evaluated is master, then run the rest of the commands that would copy the _site file to where nginx is reading it from, and then reload nginx which would then bring this new content into production, and for your eyes to see!
SSHAgent to allow scp and ssh commands from the Deploy stage script
Assuming you have created an SSH key on your jenkins user on your machine. if not, run the following as the jenkins user:
ssh-keygen -t rsa -b 4096 -m PEM
Of note, PEM is necessary to be used from the link I derived this on. I did not test if removing this arg would make it work. YMMV, but the intention is the same. Have an SSH key created.
Also, I am always one to put a passphrase to my private key. I don’t like knowing that a private key is clearly visible to anyone. One accidental cat of the private key, in the wrong place, at the wrong time can create a security breach.
You may have noticed the ssh agent credentials there in the steps section of the code.
Once created, you should make sure that you have the following Jenkins plugin called SSH Agent.
There is a place where you can add existing keys in your file system structure created by the jenkins user, and add it’s passphrase to it. That place is under Manage Jenkins » Manage Credentials » Jenkins (global) and select add credential.
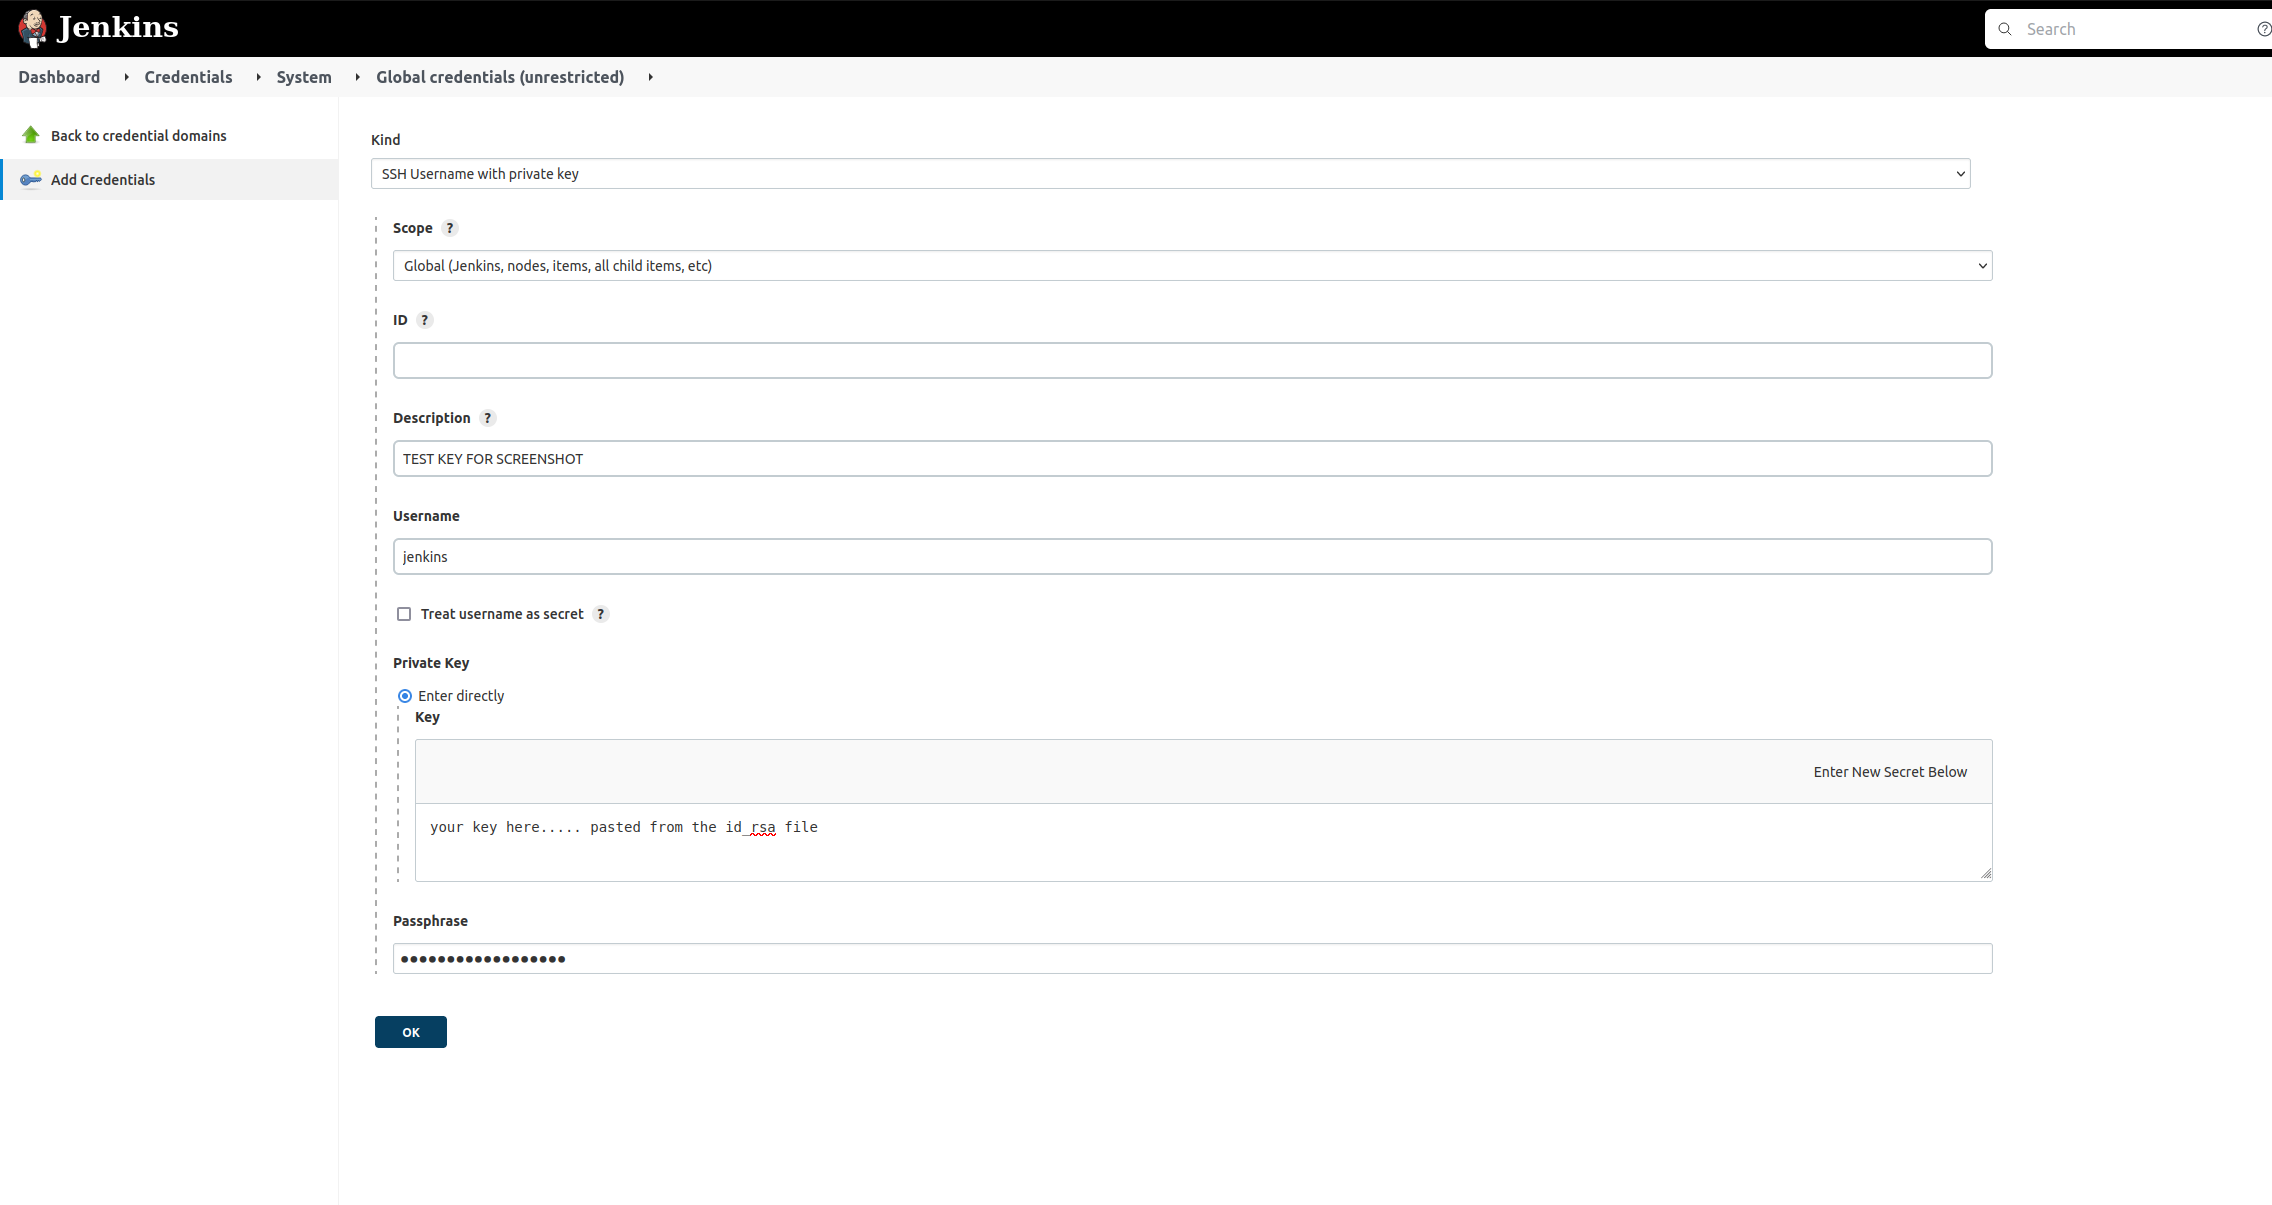
After this credential is created and saved, you should see the new entry, as seen below.

Since you don’t want to show the passphrase in clear text, the sshagent(credentials: ['ssh-credentials-id'] command is used from this plugin to reference the passphrase input. The value to use within quotes in this example, were we wanting to reference the newly created SSH key, would be eb4c3b51-81e1-46e8-bc40-3dea561c8018 and it would be put inbetween the single quotes in place of the ssh-credentials-id value.
Now, I won’t be going into what I’m doing with ssh or scp in detail. But basically what I’m doing is I’m allowing my jenkins user to log into my main user (where the main _site folder lives and nginx will be reading from to surface the web content) and copy the newly built files by Jenkins via the CI/CD process described above into where nginx is going to be reading my files from. I could have done this another way, but I wanted to learn how to publish files via SSH. Might come in handy if ever there was a more distributed system where one server would be the Jenkins node, and another server the NGINX node.
Finally the ssh command is just reloading the nginx service, which in turn will refresh the web content with the newly placed files from _site. For this case, I had to make sure that my user xortiz was found in a file I created just for him in /etc/sudoers.d/nginx. The file looks like the following, and allows me to run sudo commands relevant to nginx so that I can reload the nginx service and immediately have the new web content be surfaced on the internet.
So, a command run by xortiz such as sudo /bin/systemctl reload nginx would not require a password upon entry, and would allow an automated call to reload nginx to run without needing to log into root.
The /etc/sudoers.d/nginx file looks something like this:
xortiz ALL=NOPASSWD: /bin/systemctl start nginx
xortiz ALL=NOPASSWD: /bin/systemctl stop nginx
xortiz ALL=NOPASSWD: /bin/systemctl restart nginx
xortiz ALL=NOPASSWD: /bin/systemctl reload nginx
Closing thoughts
There is a lot of optimization to do, both on the Jenkins process (specifically the Jenkinsfile), as well as in the writing of this blog. I’ll probably proofread and edit the content at some point for posts written yesterday and today.
But now I have a beautiful CI/CD workflow, that on a commit to a branch other than master, the site is built as a test to make sure everything is working. And if a new commit comes into master, it builds the site as well as deploys it on the webserver.
Now, I can focus on making more of this high quality content!
Leave a comment